Content
You pick up interesting ideas for decorating an apartment or a house to get it beautifully, thematically and inexpensively - we will tell you what decorations you can make yourself for the New Year 2020. Creating New Year’s decor on your own can not only save money, but also get exclusive gizmos that you can’t buy in the store.
We decorate the windows
Of course, the best glass artist is frost. And his skill does not exactly surpass. But you can still try to decorate the windows. The simplest thing you can do is draw intricate patterns on the glass with a toothpaste. This is one of the most common tools for window decoration. Why?
- a tube of white paste will always be at home;
- It is inexpensive;
- paste is easier to wash from glass than any paint.
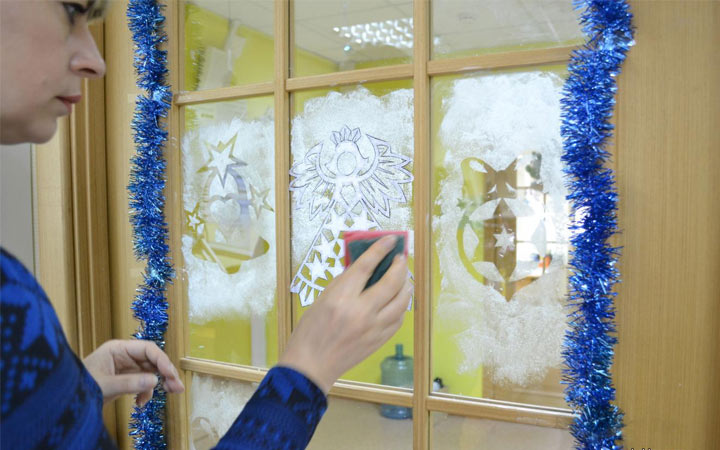
White paste can draw any snow elements: snowdrifts, trees, snowflakes, stars, a snowman. If you want a more colorful picture, you need to add food coloring to the toothpaste. Then you can draw whole landscapes with deers, cones, Santa Claus and Snow Maiden.
How to do all this? To get started, we’ll prepare everything you need:
- toothpaste (even the cheapest, but not gel, white paste is suitable);
- Easel (any non-absorbing surface can be used: a piece of linoleum, laminated paper, a file worn on a sheet of cardboard, etc.);
- food coloring (sold in hypermarkets) or any other paint;
- toothpicks for mixing paste and dye;
- tassels;
- foam sponges;
- plastic stencils from children's drawing sets or paper and scissors for self-cutting patterns;
- toothbrush (to create the effect of splashes on the glass).

Let's try to draw.
- First, take a plain white toothpaste and squeeze it onto an easel.
- We hook the paste with a brush and begin to draw on the window.
- Now take the stencil. Dip the foam sponge into the paste and fill the drawing with dotted movements. The photo shows how the bunny runs.
- You can also draw sprigs of Christmas trees with a sponge, and then use a toothpick to draw needles on them. It turns out very beautifully!
- Add “snow”. Dip a toothbrush into the paste, direct it to the window and draw it through the bristles with your finger. The paste is sprayed onto the glass and you get snowflakes. If the paste is very thick, you can pre-dilute it with water.
- You can cut a snowflake out of paper and stick it on a window. And sprinkle the paste on top. Then peel off the snowflake. This is also shown in the photo.
- If you need to get color patterns, add a little dye to the paste and mix thoroughly. Now you can draw with at least a brush, at least a sponge, at least spray with a brush.
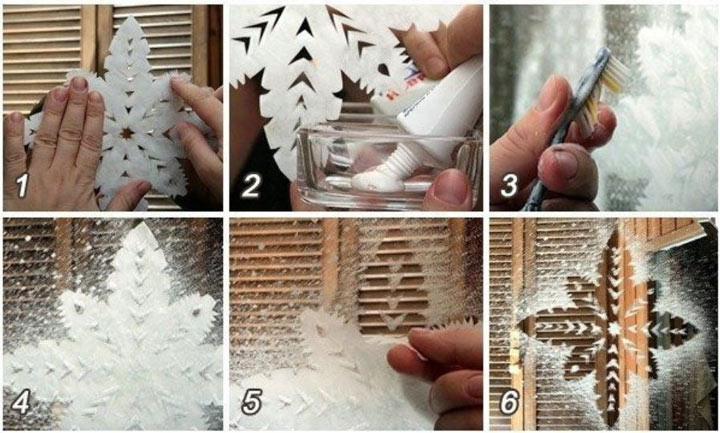
Patterns of toothpaste on the window are good because they are visible not only from the inside, but also from the outside. Passers-by will admire the decoration of your apartment for the New Year 2020.
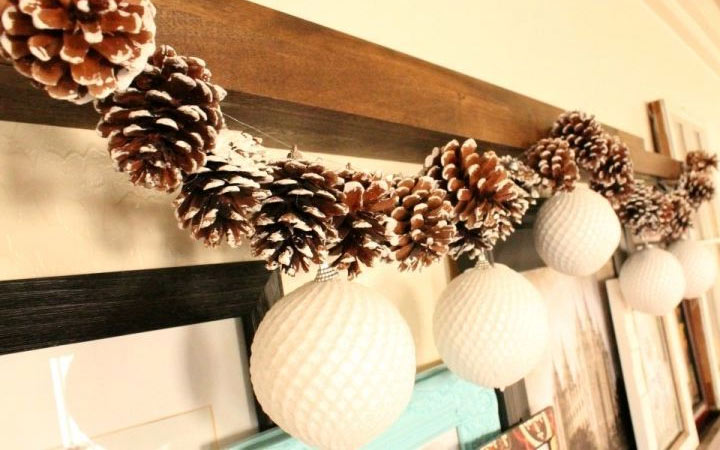
Cone garland
On New Year's Eve, a lot of garlands are sold in stores: luminous and ordinary. But you can decorate your home with homemade stretch marks made of cones. This jewelry is not only original and beautiful, but also natural, made of natural material.
To work, you will need the following:
- a lot of spruce or pine cones (they can be gathered in the forest or in the park);
- acrylic white paint;
- a sheet of cardboard;
- cord "New Year's" color: white, red, green. In our case, this is a white-red cord resembling a candy.
Making a garland of cones to decorate an apartment for the New Year 2020 is as easy as shelling pears.
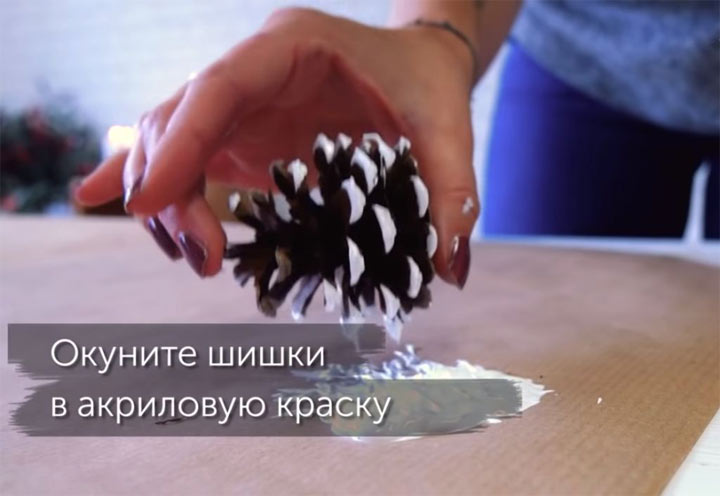
1. Pour acrylic paint on cardboard.
2. Bump the bumps in the paint so that it falls only on the tips. The effect of snow will turn out.
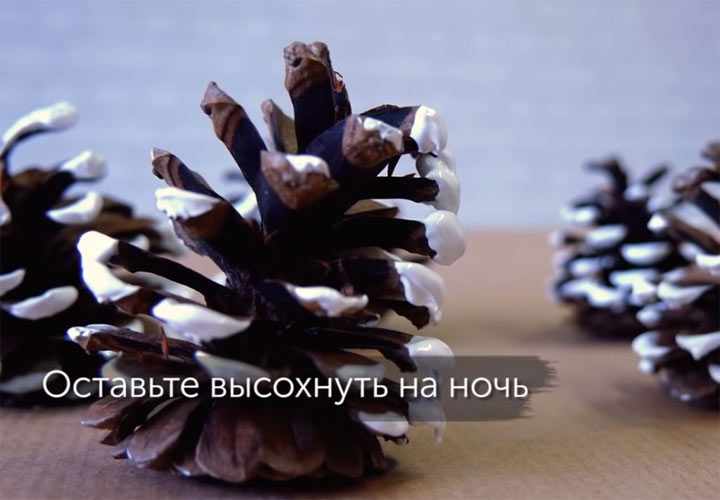
3. We are waiting for drying (it is better to leave it overnight so that the cones dry out well).
4. Wrap the cones with a cord, hiding the bundle between the scales.
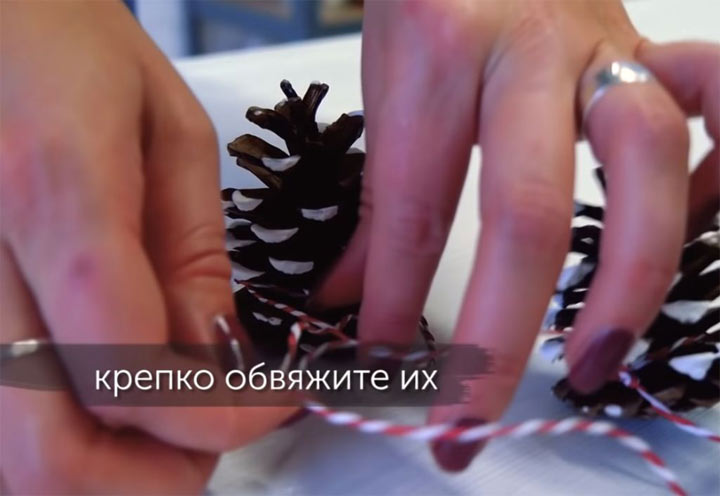
5. It is better to leave a distance of about 10 cm between the cones. They should not be too close - it will turn out ugly. And far too it is not necessary.
You can make one long garland or several short. They can be decorated with walls, chandeliers, doors and any other elements of the room. The decoration of the house outside will also look spectacular. You can also combine a stretch of cones with a real luminous garland. The lights will highlight the cones and create a New Year's mood.
Artificial snow
It is not known what weather awaits us on New Year's Eve 2020. And someone will even meet him in warm countries. Imitation of snow will allow you to better feel the New Year. And they can be decorated with various crafts.
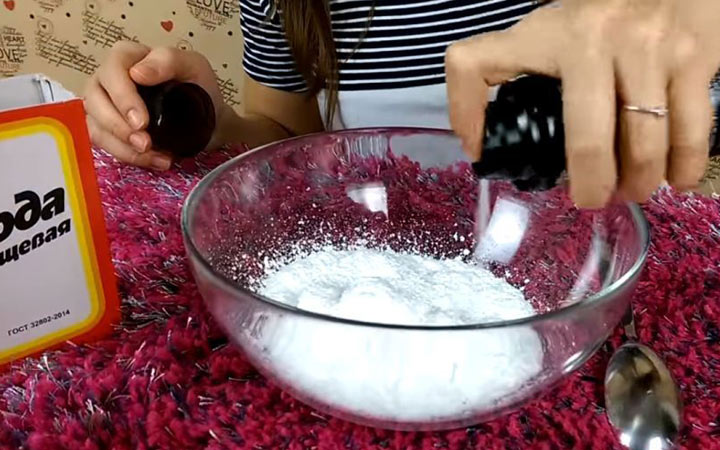
There are two ways to make artificial snow. They will need the following:
- shaving foam;
- tea soda;
- After Shave Cream;
- potato starch;
- mixing containers;
- a spoon;
- food coloring to color the snow.
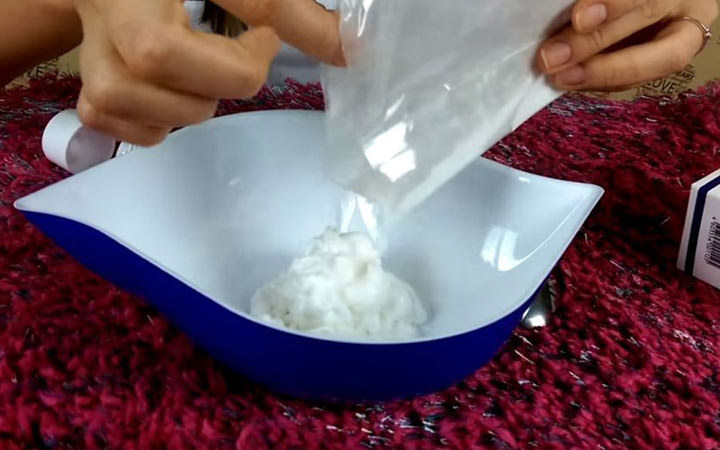
Method one
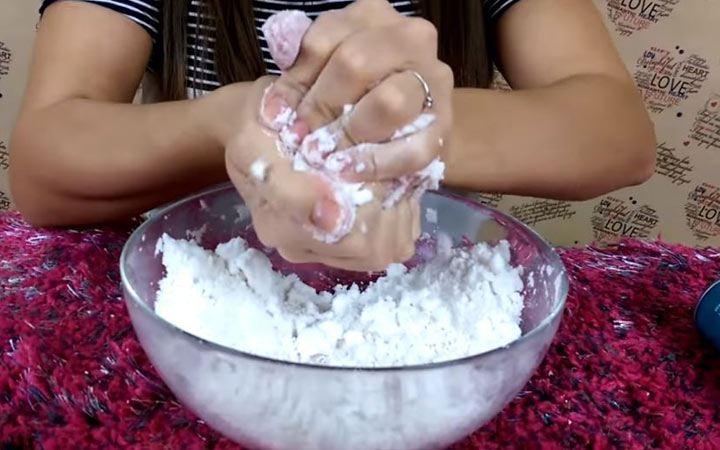
Step 1. Pour shaving foam into a deep bowl.
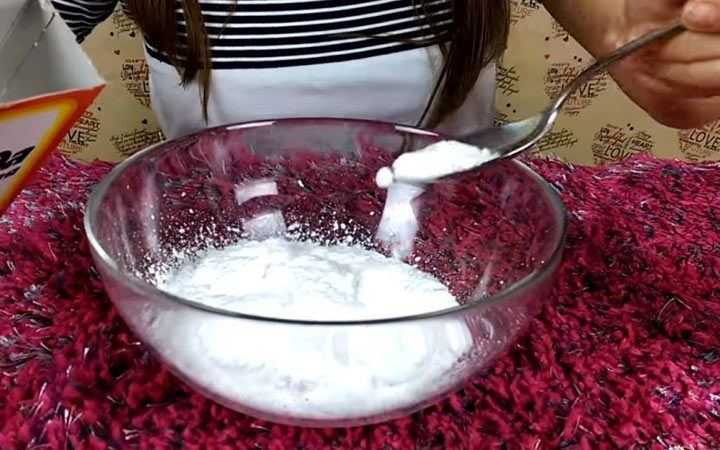
Step 2. We begin to gradually add soda and knead until the mixture acquires the consistency of snow. He should crumble in his hands and not stick to them.

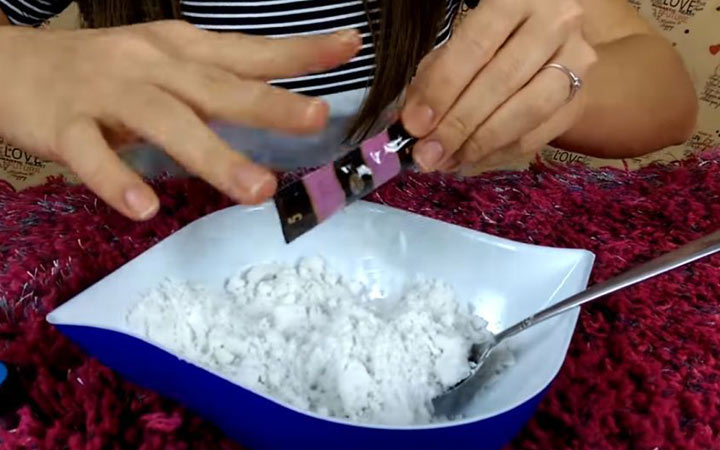
Second way
Step 1. Pour the cream after shaving into a deep bowl.
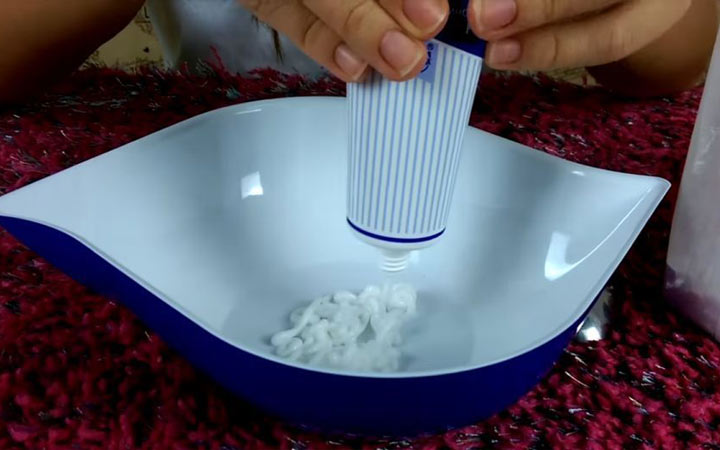
Step 2. Gradually add starch and knead. Such snow turns out to be more natural, because it also crunches.

Color dye can be added to any of the resulting snows. You can also add sparkles. Artificial snow is used to decorate crafts and decorations. They can be sprinkled with Christmas tree branches, sprinkled in transparent vases and glasses, or just scattered around the apartment. Artificial snow is removed with a whisk or vacuum cleaner.
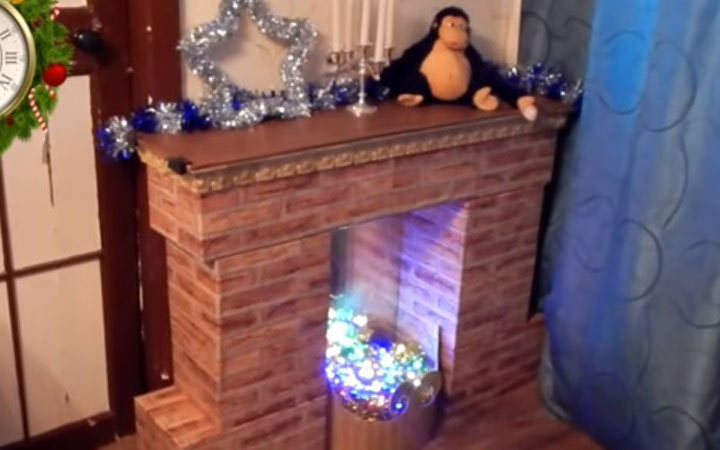
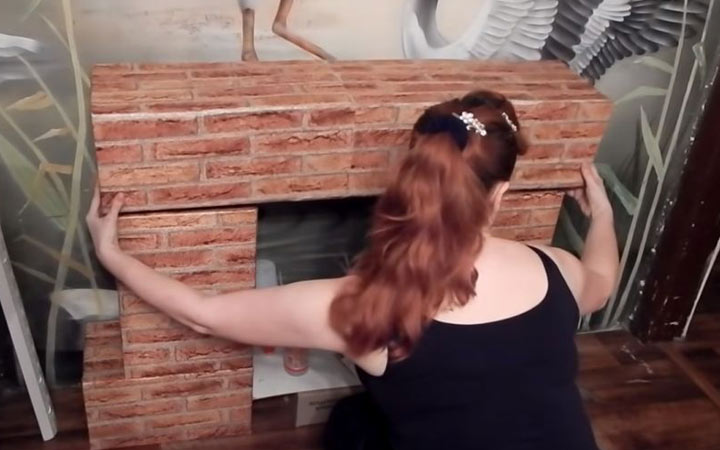
Cardboard box fireplace
The classic attribute of the American and European New Year is the fireplace. In Russian apartments it is not, and not in every private house you can see this piece of furniture. But if you connect your wit, you can make a decorative fireplace, which will be an excellent decoration of the living room.
To do this, you need the following:
- a lot of cardboard boxes (it is better that they be the same size, so that the fireplace turns out to be uniform in height and width);
- self-adhesive paper or wallpaper with a brick pattern;
- self-adhesive paper with a wood pattern;
- golden foil;
- paper glue;
- scissors;
- pencil and ruler;
- 3 pieces of fiberboard (one to simulate a countertop, another to simulate a grill, the third will become the back wall of the fireplace);
- saw on wood;
- sandpaper;
- golden and black acrylic paint;
- flat brush;
- beautiful ceiling plinth (about 3 m).
The work will be long, but not difficult. Perhaps male strength will be needed: it will be necessary to cut out the "grate".
1. We seal cardboard boxes so that they do not open.
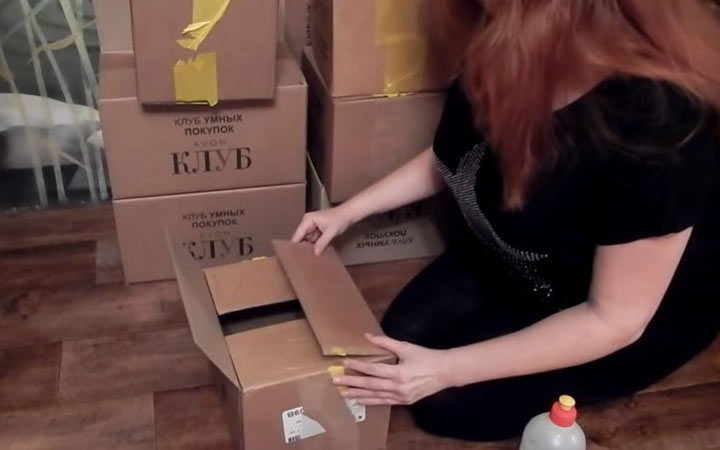
2. We spread how the finished fireplace will look.
3. We glue the boxes together.
4. Glue the finished parts with wallpaper.
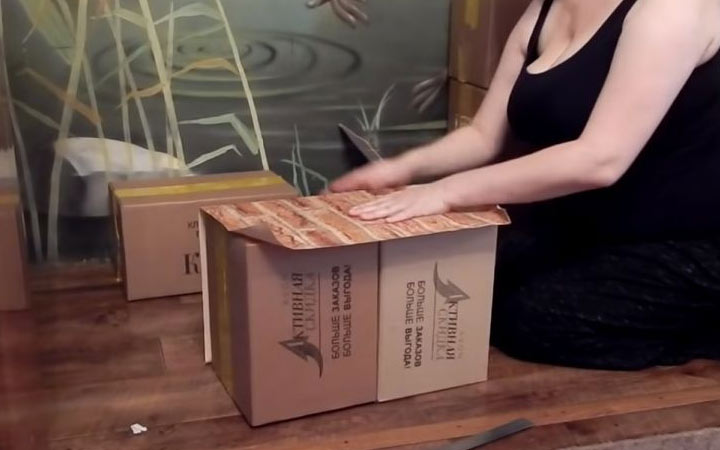
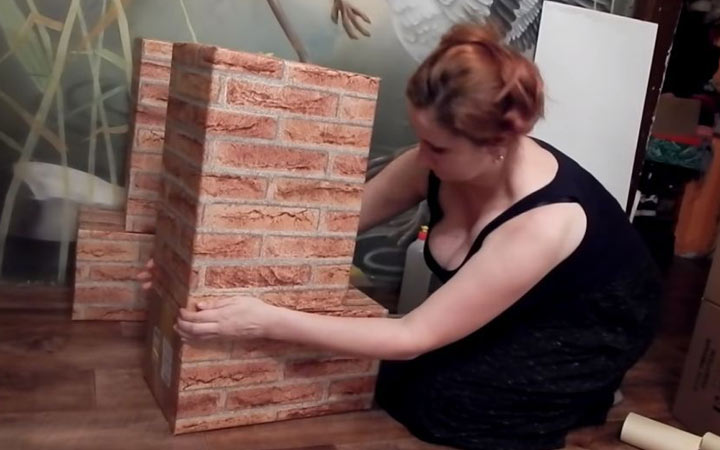
The brick pattern should look horizontally, not vertically.
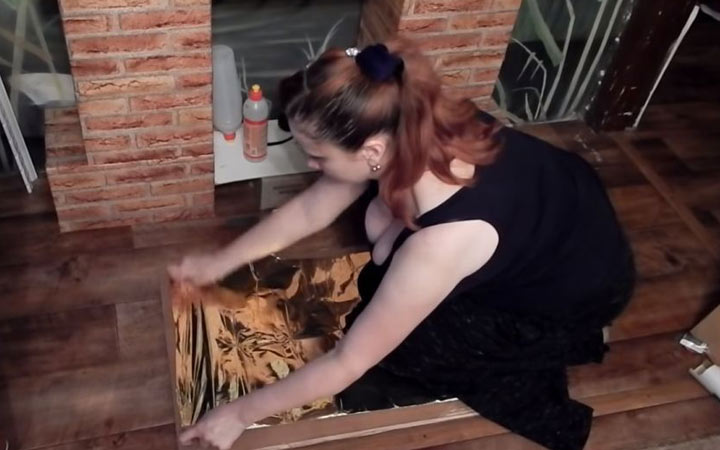
5. Glue a golden foil onto one piece of fiberboard. This will be the back of the fireplace. We strengthen it in place.
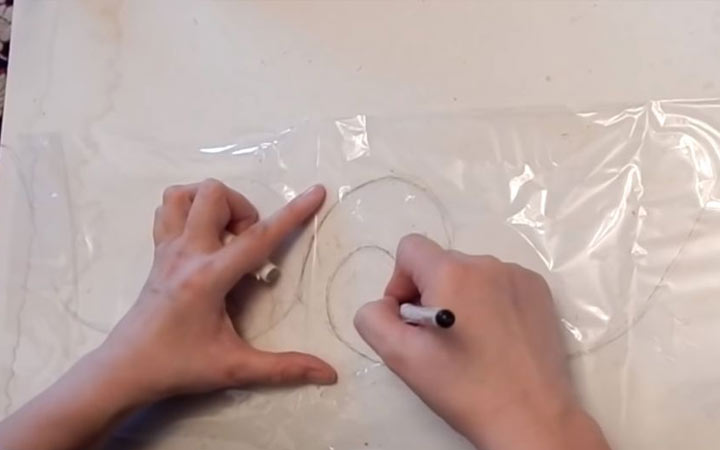
6. On the other piece of fiberboard draw a grid.
7. We cut out the grate and clean the edges with sandpaper.
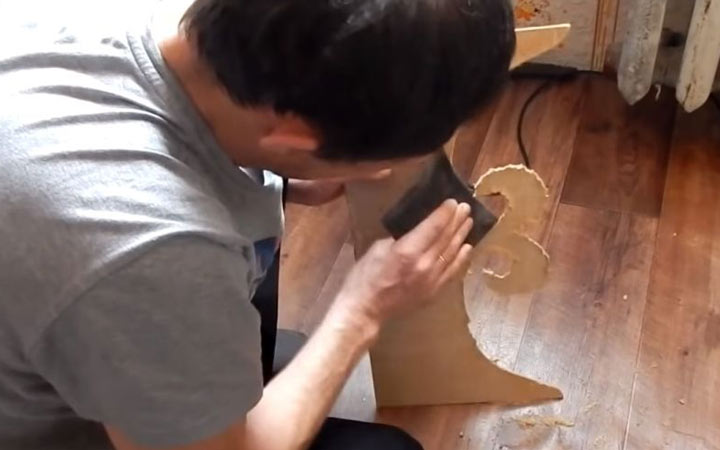
8. Cover the grate with paint. In our example, golden, but you can make black. Brush the relief to make it more beautiful.
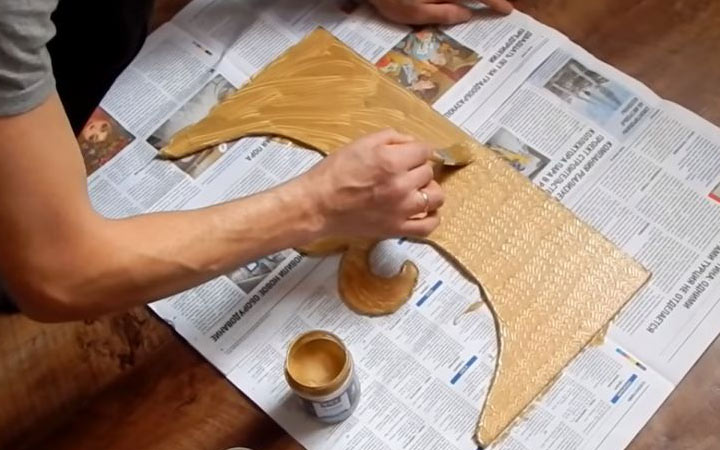
9. While the "lattice" dries, we glue the baseboard to the fireplace and cover it with golden paint.
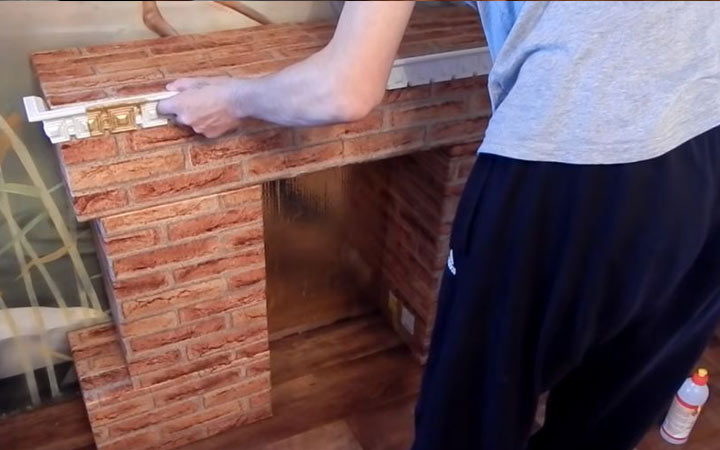
10. On another piece of fiberboard we paste a self-adhesive with a wood pattern. We glue the "countertop" on the fireplace and install the "grate" (also glue).
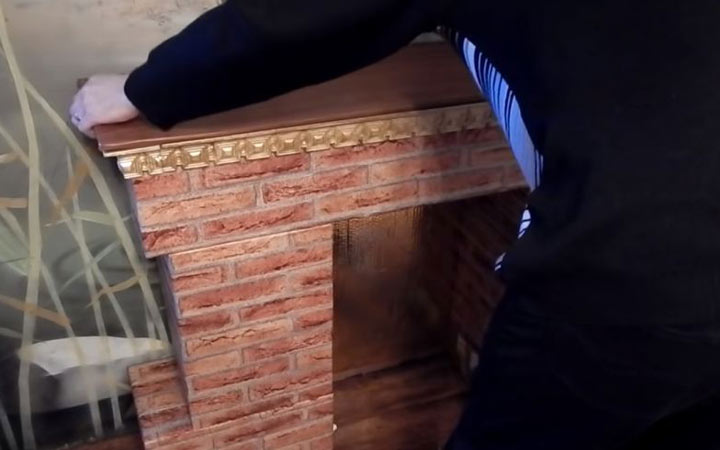
11. We decorate the fireplace with decorative elements.You can put a soft toy on top (since 2020 is the year of the Rat, you can put a soft rat or mouse on top), a candlestick or any other Christmas decoration.
We must not forget that this is a fireplace made of cardboard boxes, so you can not put heavy objects on it.
New Year pillowcases
New Year is a cosiness. And comfort is sofa cushions. We will make original pillowcases with our own hands, which will create a New Year's mood and become an excellent decoration of the living room.
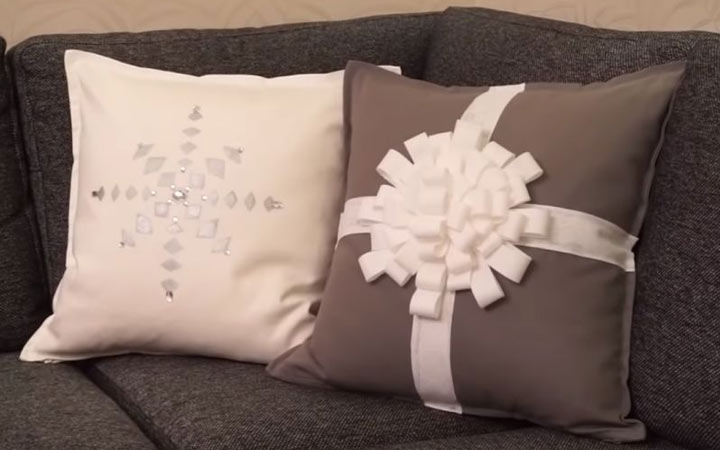
For the first pillow we need:
- cotton pillowcase;
- paper;
- masking tape;
- scissors;
- foam sponge;
- fabric paint (for example, silver, as in our example);
- fabric glue;
- decorative elements such as sequins, beads.
Go.
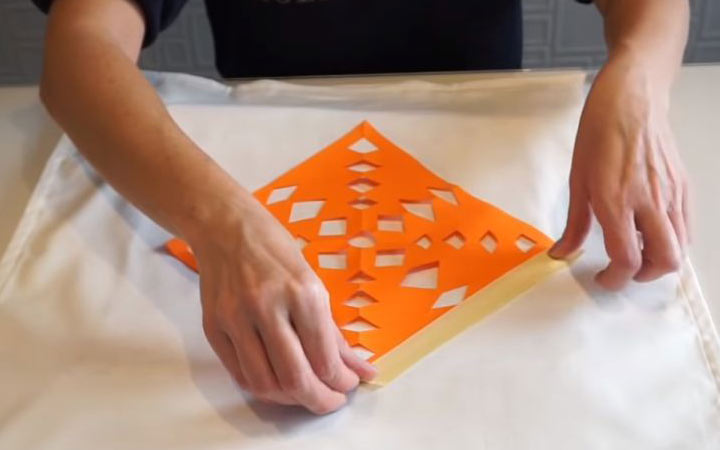
1. Cut out a snowflake from paper. To do this, fold the sheet diagonally 3 times, and then cut the geometric shapes along the edges.
 2. We put a cardboard box between two layers of pillowcases (so as not to stain the second layer), and lay a snowflake stencil on top. We fix the stencil with masking tape.
3. Using dotted sponges, cover the stencil. A beautiful pattern is imprinted on the pillowcase.
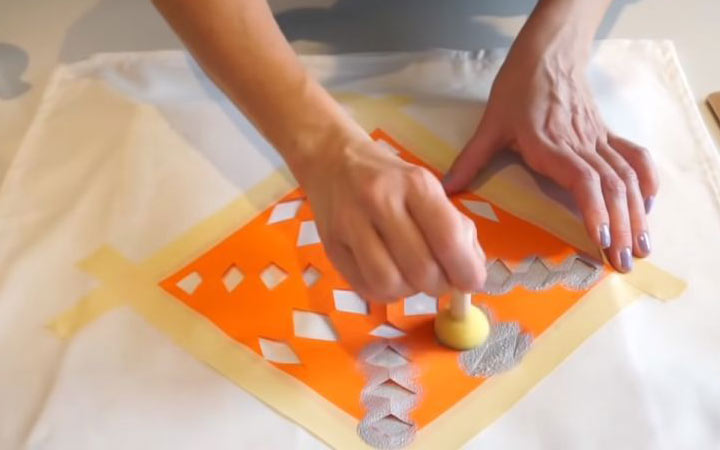
4. We wait 10 minutes for the paint to dry, and then carefully remove the stencil.
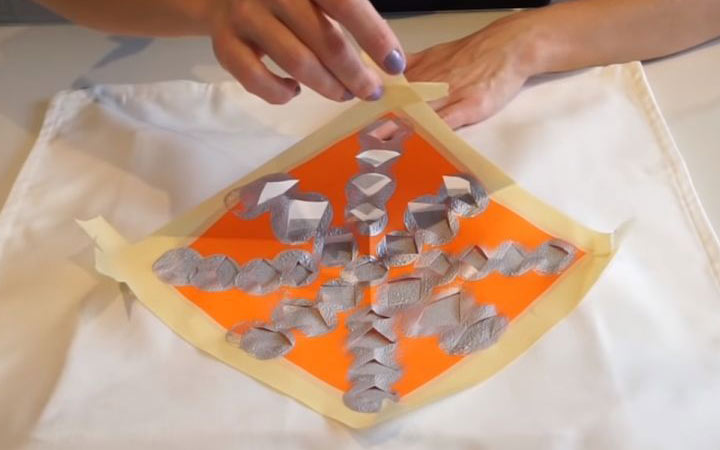
5. Glue the fabric to glue rhinestones and beads to the pillowcase.

6. One pillowcase is ready! You can put it on a pillow.
For the second pillowcase you will need the following:
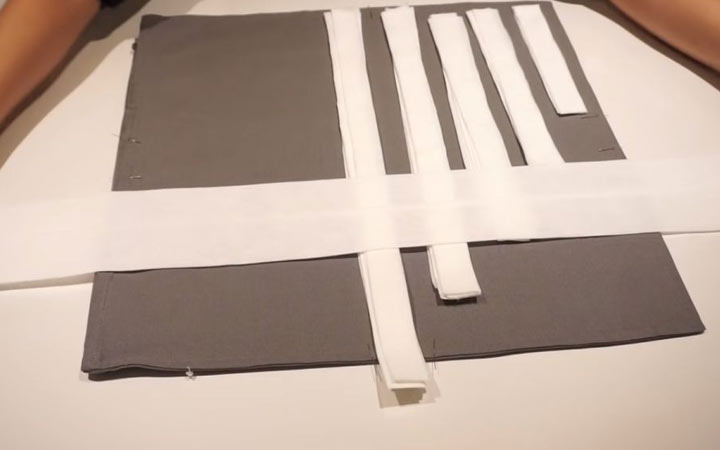
- gray pillowcase;
- white strips of fabric (for example, calico) of different lengths: 52 * 5 (2 pieces), 52 * 3 (5 pieces), 44 * 3 (5 pieces); 36 * 3 (5 pieces), 28 * 3 (4 pieces), 20 * 3 (3 pieces);
- hot glue;
- scissors.
Getting down.
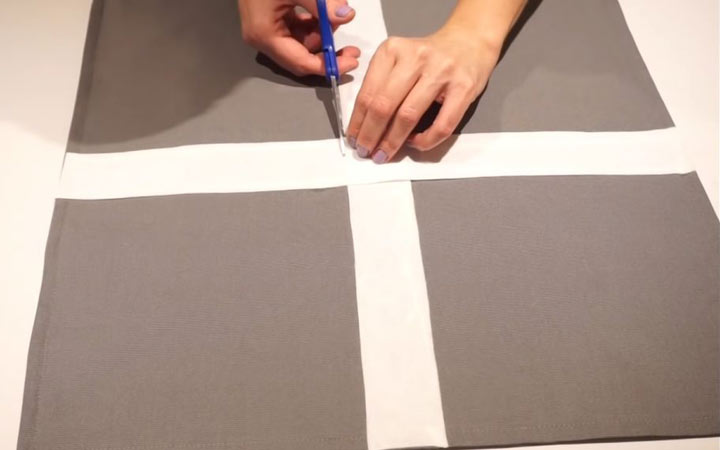
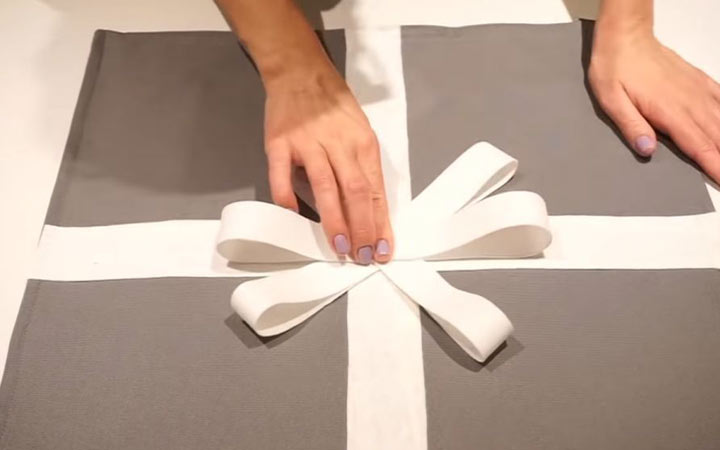
1. The largest strips are laid crosswise in the middle of the pillowcase.
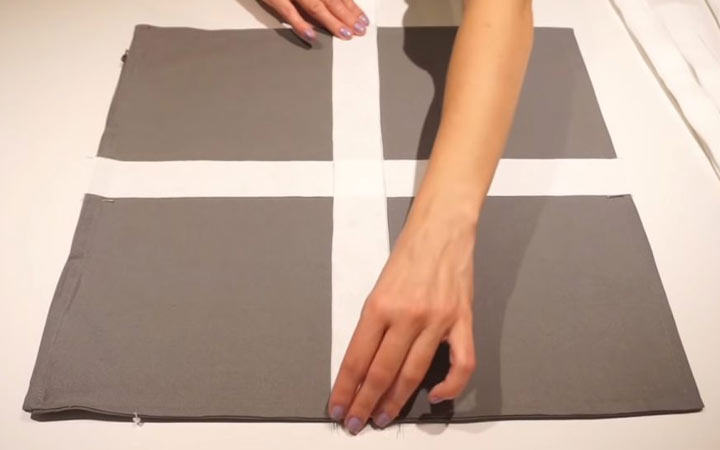
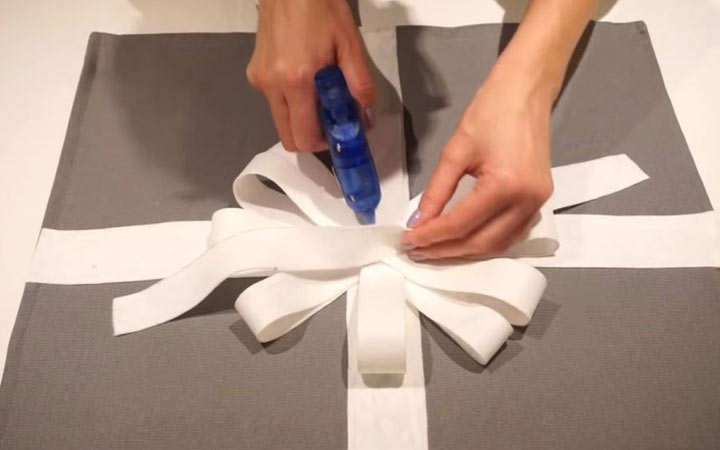
2. Glue strips along the entire length, except for the middle! We cut the middle.
3. Now collect the bow. To do this, put the remaining pieces of fabric with the ends to the middle and glue.
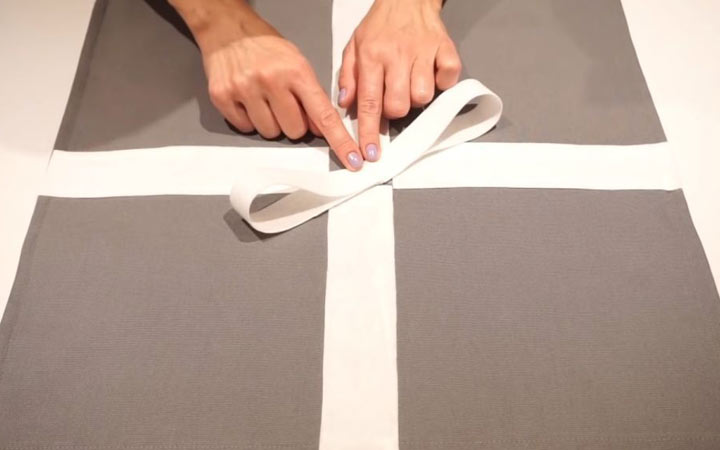
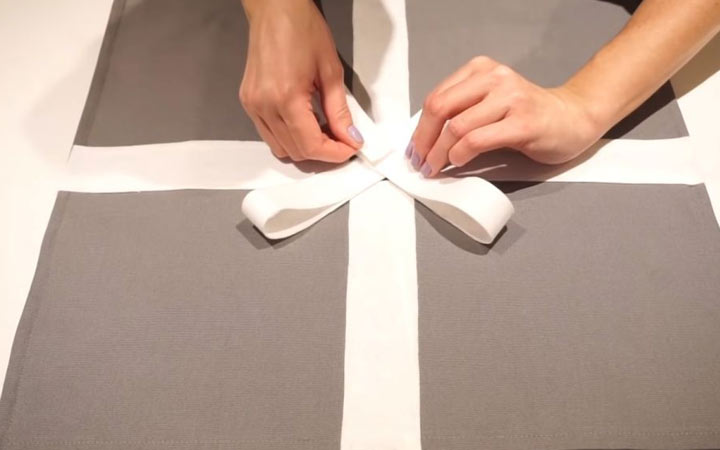
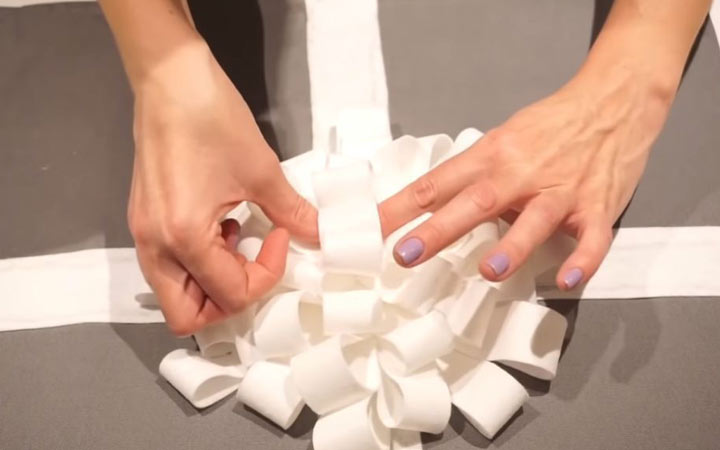
4. We stack the bow elements, as in the photo.
5. If you use all strips of fabric, you get a very large and magnificent bow.
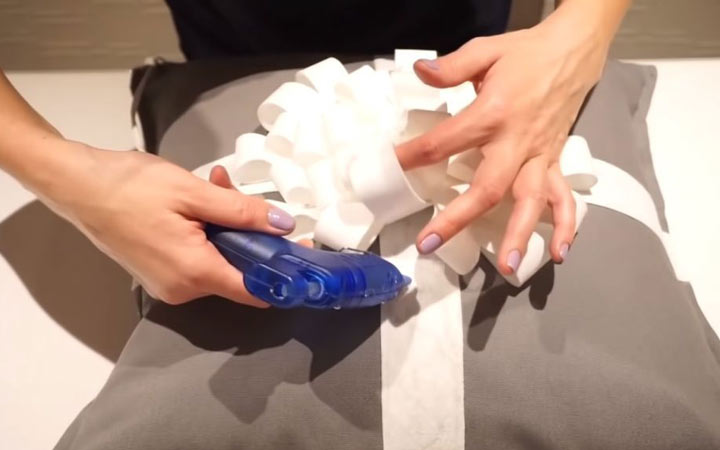
6. In the middle, glue a ring of fabric or a beautiful brooch. Petals can be glued so that they do not protrude.
Instead of hot glue, you can use a needle with a white thread. The colors of the pillowcases can also be any, depending on the interior of the apartment. You can use New Year's combinations: red with green, blue with white, golden with silver. You can also experiment with the number and size of stencils: it can be not one big snowflake, but several small ones.
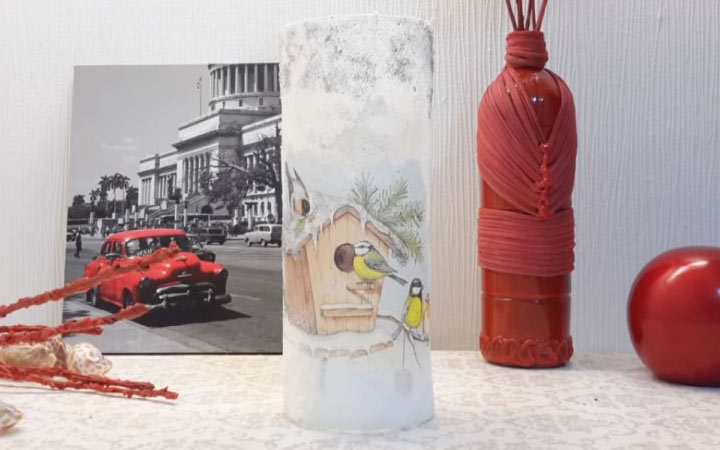
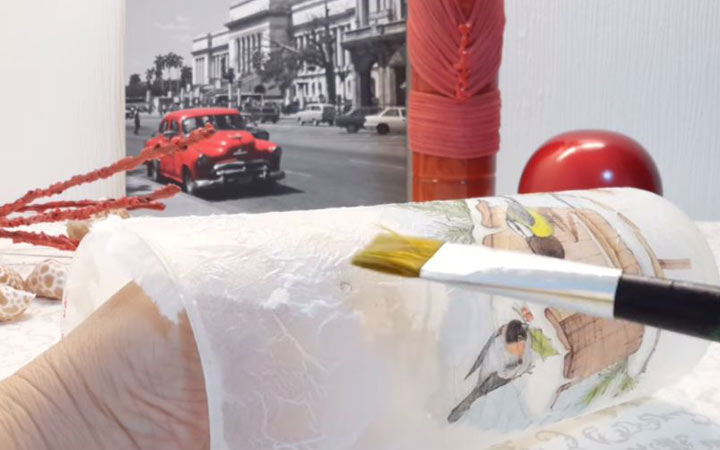
Decoupage Christmas vase
It is not customary to give flowers for the New Year, but vases as decoration of an apartment are still relevant, because you can put coniferous branches there or throw Christmas balls and cones inside. We offer to make a glass vase even more beautiful and New Year's.
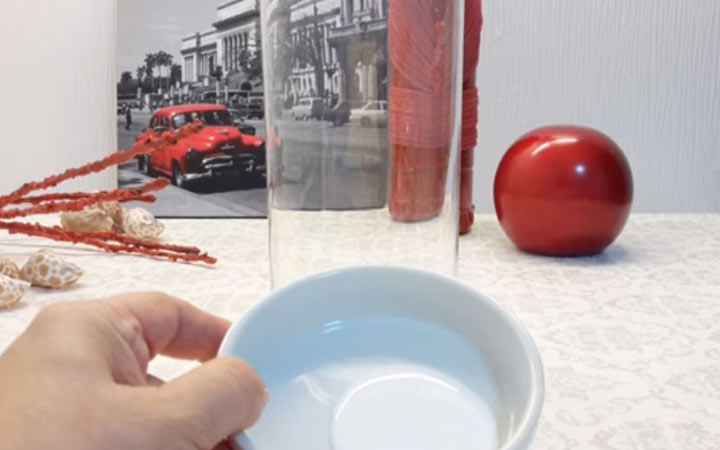
For this you need:
- glass vase;
- paper napkin with New Year or winter pattern;
- PVA glue;
- a bowl;
- small flat brush;
- fine salt;
- sparkles;
- hair fixation spray;
Getting down.
1. Bring PVA glue in a bowl with water to a thick cream.
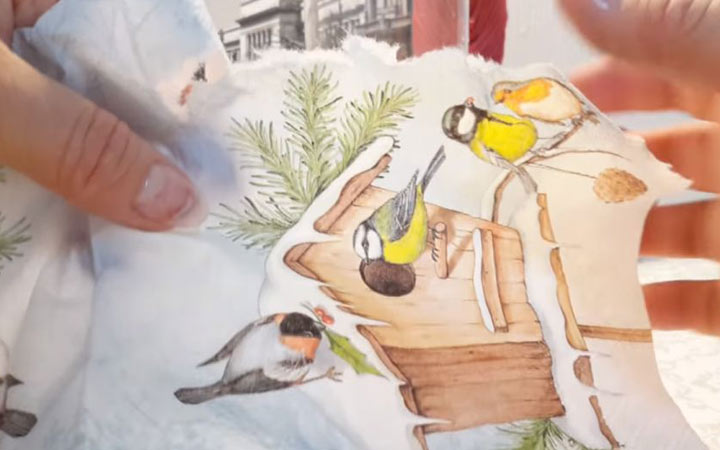
2. From the napkin, disconnect the top layer with the picture and cut off the excess (it is torn off, and not cut off with scissors).
3. We put a napkin on the vase and cover it with diluted glue.
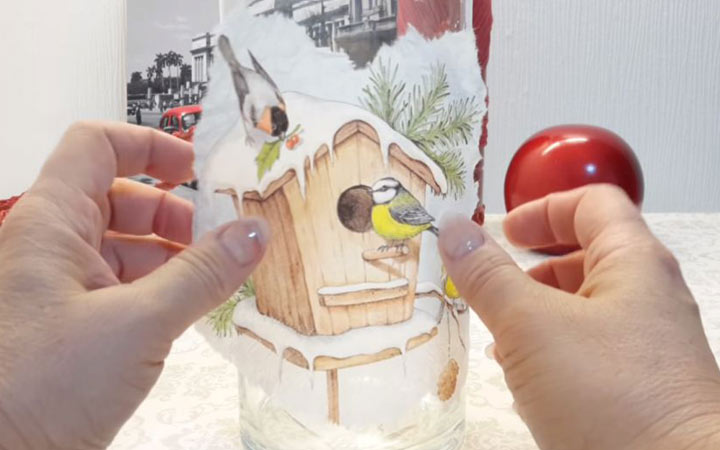
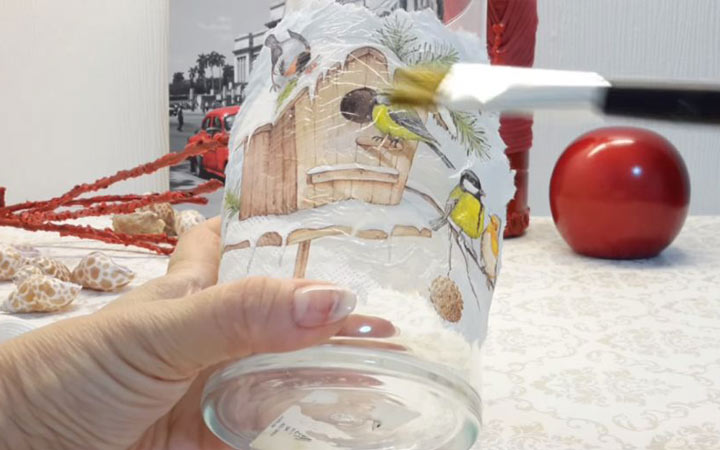
4. We put pieces of a white napkin on the free sections of the vase and also cover with glue.
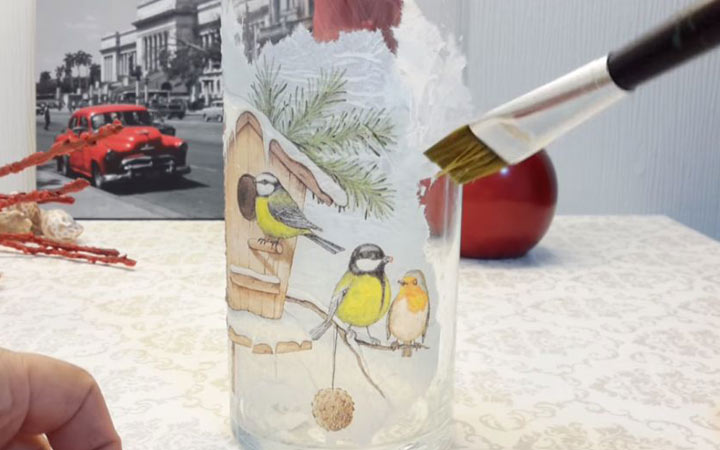
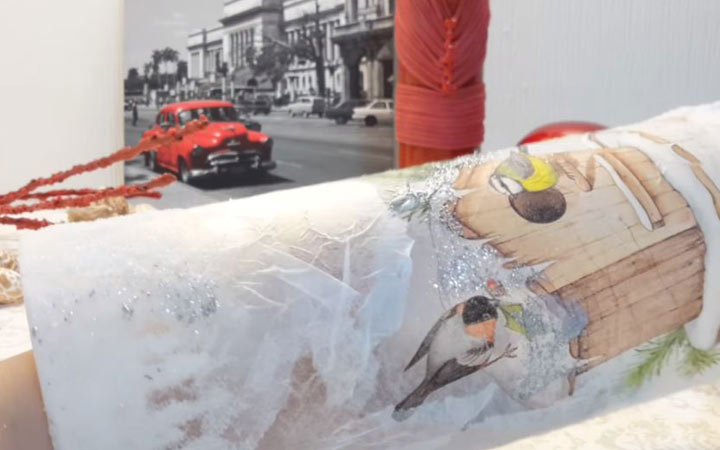
5. We cover the upper part of the vase with undiluted PVA glue and immediately sprinkle with salt on top. It turns out the effect of snow.

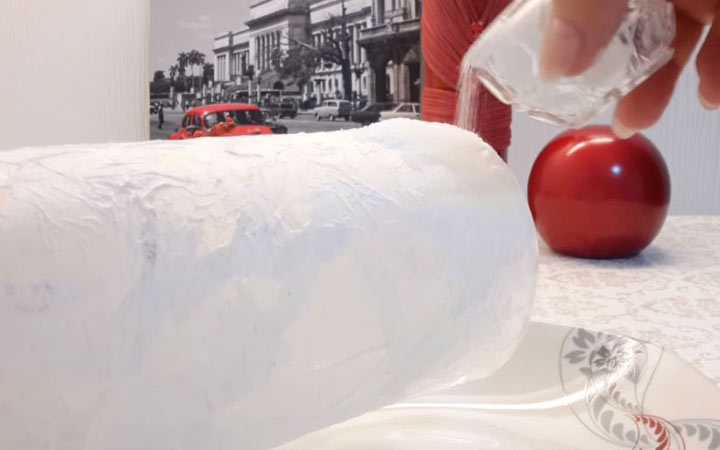
6. We apply sparkles to the drawing, having previously lubricated the necessary places with a small amount of glue.
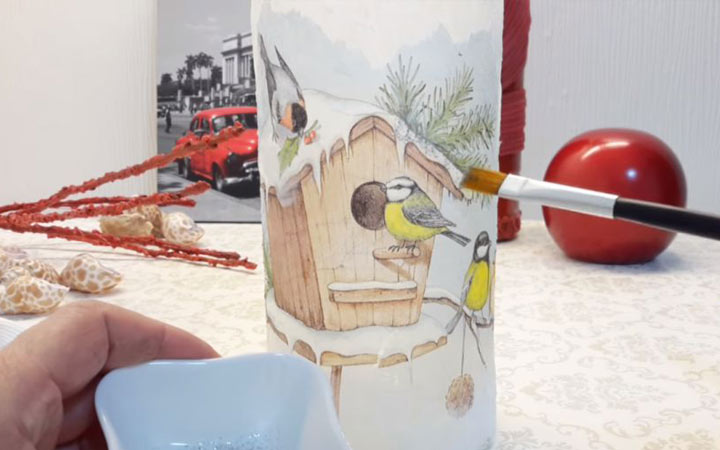
7. We fix the entire vase with hairspray to fix the pattern and sparkles.
Working in decoupage technique is very interesting. In a similar way, you can create a variety of decorations with your own hands, because napkins can be glued to any smooth surface.
Read also:
- DIY 2020 New Year Cards
- Do-it-yourself needlework for the New Year 2020
- Window cutters for the New Year 2020
 (3 ratings, average: 5,00 out of 5)