Content
With the approach of such welcome winter holidays, needlewomen begin to prepare crafts. After all, it is with their help that you can prepare the house for the New Year's Eve 2020 - to decorate, refresh the decor, create the atmosphere of a fairy tale. Otherwise, how to attract good luck, prosperity and prosperity, if the home will look "gloomy" and inhospitable.
New Year's decor "for good luck"
Today it is fashionable to follow the Chinese tradition of meeting the main winter holiday. And although according to the eastern calendar, the year of the Rat begins only on January 19, nothing will prevent it from being celebrated on December 31 with all the proper honors. You need to celebrate, observing certain rituals, then the patron animal will show favor and give the whole family joyful changes.
2020 will be marked by the Metal Rat. This means that white and silver tones should prevail in the New Year's decor, although bright accents are also not excluded. Hand made from real metal can only be handled on the shoulder, but it is possible to imitate material difficult to process. This is enough to please the picky Rat. It offers needlewomen plasticine, paper, fabrics and leather with a metallic effect, as well as paints and enamels, which create a very believable texture.
Of course, it is necessary that the image of the main symbol of the year appears in the house, and in large quantities. You can make not only soft toys or figures, but also Christmas tree decorations with the image of a mouse and a rat. It is good to take care of small thematic souvenirs for guests who will come on New Year's holidays.

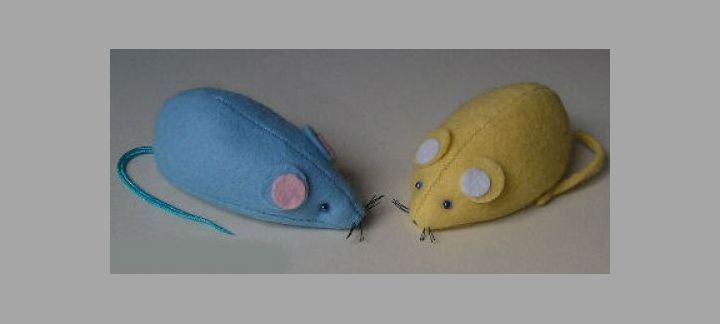
Felt toy "Rat"
A cute soft rodent with pleasure will be made by children - it is not at all complicated. If you don’t have felt at hand, you can replace it with any dense, pleasant to the touch material: short-hair fur, tweed, boucle and even velvet. It is better to take colors that are bright, cheerful, so that the children rejoice, and the house is filled with positive.
In addition to the fabric you will need:
- beads for the eyes;
- filler - syntapon or cotton;
- sewing tools.
From the fabric you need to cut 2 sidewalls, an “abdomen” rat, 4 circles for the ears and a strip of tail. Do not forget to leave allowances for the seam, otherwise the toy will turn out to be smaller than it seemed.
Pattern pattern:
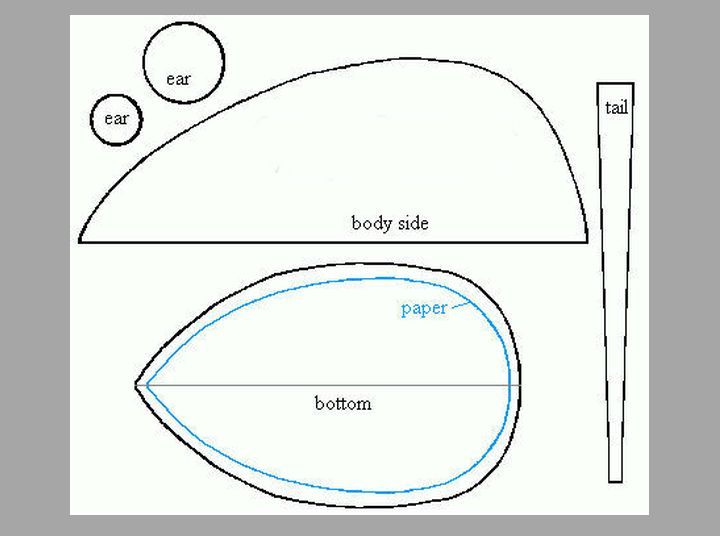
- Details of the toy are ready. The tummy can be additionally sealed with cardboard so that the rat is more stable.
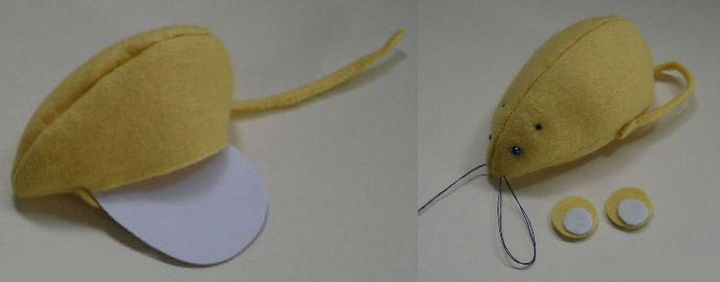
- We fold the tail in half to give volume and flash it with a hidden seam.
- We grind the sidewalls on the machine, leaving the abdomen free.
- Attach the lower part to the 2nd open edges. We leave a place to insert a cardboard and fill the toy inside.

- We turn the product on the front side, seal and stuff with a syntapon, making sure that it is evenly distributed, without forming voids and tubercles. Put the tail and sew the hole with a blind stitch.
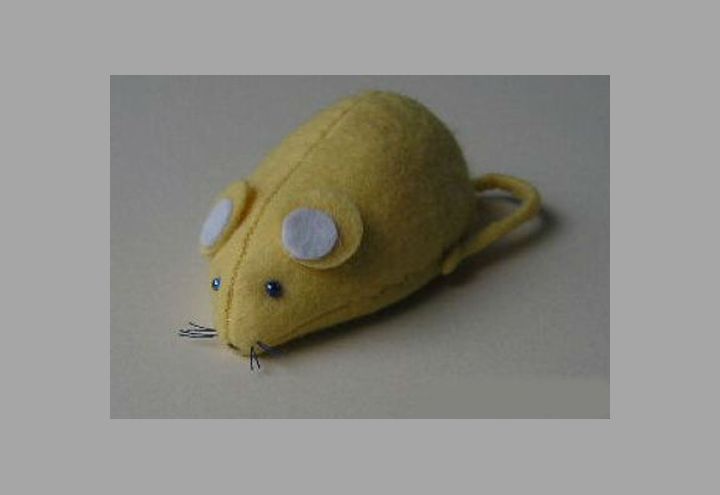
- We glue the ears in pairs from 2 parts and attach the rat to the head. We make eyes out of beads. We embroider a black thread with a nose. We obtain the mustache as follows: several times we sew the muzzle without tightening the loops. Cut the ends of the thread and lubricate the PVA so that it does not spill out.
- You can attach a loop of ribbon to the back of the toy and hang it on the Christmas tree as a decoration.Or to sew for the New Year 2020 several multi-colored rat pups and put them in a decorative basket.
Souvenir from salt dough "Cheese lover"
The so-called bioceramics - the mass for sculpting from a mixture of water, salt and flour is becoming increasingly popular. And not only because the material is much cheaper than industrial analogues, but also because of its environmental friendliness, strength and durability. It is no less simple to work with salt dough than with plasticine, with the difference that the products do not deform over time, losing their original appearance.
And polymer masses, such as cernite or fimo, are not very suitable for children because of their toxicity, and the price is impressive. A small souvenir - a mouse on cheese can be presented to guests or, having glued a magnetic blank to it, decorate the refrigerator for the New Year. There are many recipes for salt dough, the smoothness of the product, the ability to make delicate details, and the convenience of work depend on its composition. The option given in MK is intended for small plastic.
Important: for the test take only fine Extra salt and add ice water to it so that it does not stick to your hands.
You will need:
- 1 ½ cup flour;
- 1 cup of shallow salt (sea does not fit, it is heterogeneous);
- ½ cup cold water;
- 2 - 3 tbsp. tablespoons of wallpaper glue or a little PVA, for strength and ductility.
In addition, you need:
- paints are better than watercolors, because gouache looks rough, and under acrylic the dough may crack;
- varnish for wood;
- stacks, knife, rolling pin for dough.
Step-by-step manufacturing:
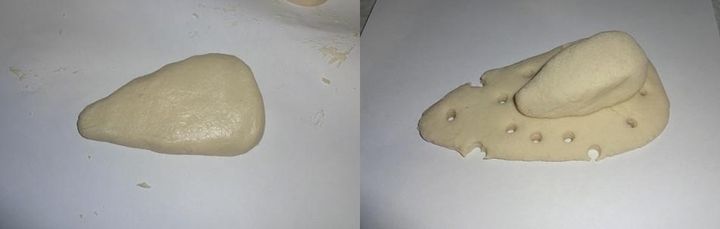
- Mix the dry ingredients - flour and salt, then pour water and thoroughly knead the mass. It should be gentle, soft, uniform and not stick to your hands. Add PVA and knead again. Then we put paper on a flat surface and roll out a layer of dough, 1 cm thick. We cut out a triangle - the future piece of cheese and again we pass with a rolling pin to make the shape rounded.
- Squeeze the holes with the blunt end of the pencil. You can make them of different diameters like in real cheese. We roll an oval-shaped workpiece from another piece of dough, slightly extend one side - we get a mouse "nose". We sit a lover of cheese on her favorite piece.
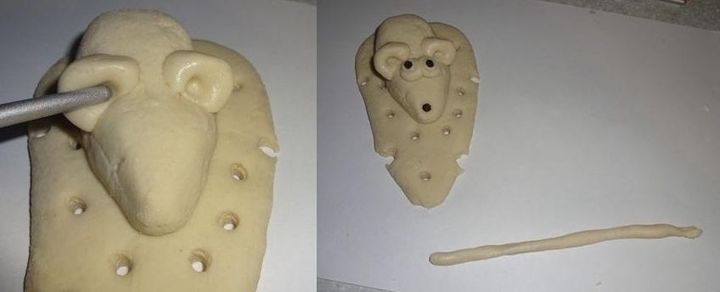
- We squeeze two small balls with a stack, forming ears and glue them on the water to the body.
- We make round eyes, and the pupils and nose are made from peas of black pepper. For the tail, we roll a piece of dough with our fingers like dumplings, stretching in different directions.
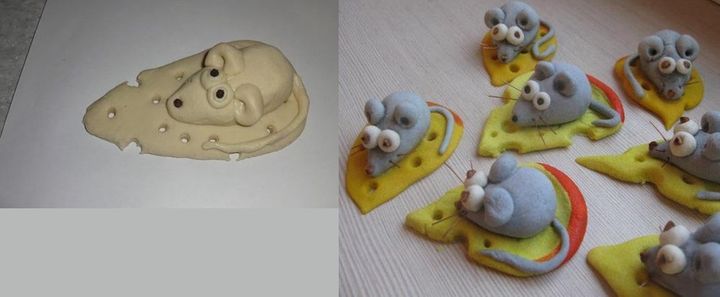
- The finished product is left to dry. It is better if this happens naturally, rather than in the oven. Otherwise, cracks may appear due to the fact that the top layer is already dry, and the figure remains moist inside.
- After drying, the mouse “with girlfriends” (after all, there are not many souvenirs) is painted with watercolors. We cover with a thin layer of varnish, better than matte, so the craft looks nobler.
Charming sock snowman
The idea to turn wardrobe items into toys was first visited by American needlewomen in the middle of the last century. Such crafts were called sock toy and were incredibly popular. Now there is no need to be upset about a lost or torn sock - you can turn a pair of it into a cute creature that delights the whole family.
Originating as an attempt to dispose of unnecessary things, the direction of sock toy gradually turned into a profitable commercial needlework. Today, few people use old socks for him - not aesthetically, and the “lifespan” of toys will be short. So the crafts for the New Year - 2020 is also better to do and special linen bought for this occasion.
It will be required:
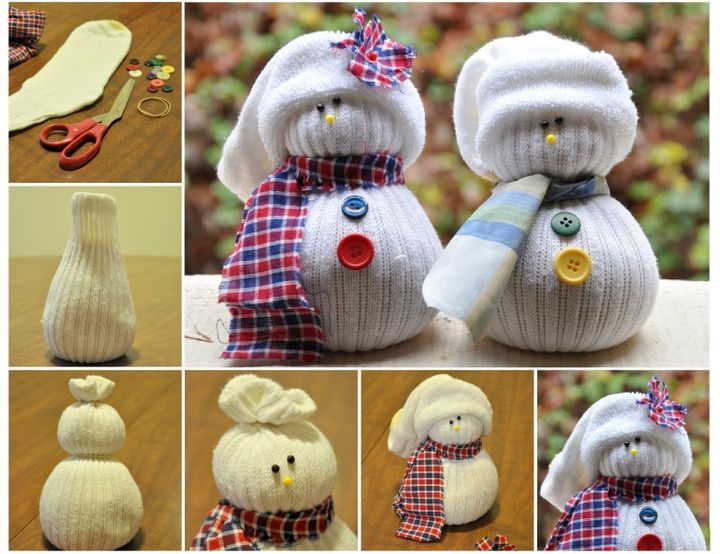
- double-sided white socks - terry inside, and tied with a large elastic band on top;
- nice fabric in a small box for a scarf;
- multi-colored buttons;
- beads for eyes and nose;
- filler: holofiber, synthetic winterizer or grain.
Cut off the foot at one sock, leaving only the straight upper part. This is the torso of a snowman. Turning inside out, we sew the bootleg from one edge, and then again go to the front side. Fill the sock as tightly as possible with the selected filler, and then tie it with a rope.
We determine where the head will be - about 1/3 of the total body height and in this place we “intercept” the toy with a thread wound in several layers. A snowman is formed and it's time to start decorating it. We turn the cut off part of the sock up and put it on the “winter guard”, and we get a wonderful fashionable cap. Sew eyes and nose, tie a scarf, fasten buttons. You can make 2 snowmen - a "girl" and a boy ", varying their decor.
Cute toys will become wonderful decorations "under the Christmas tree" or decorate the New Year's table. They are good as a gift, especially for younger members of the family.
When the New Year is not up to the bulb
It’s a pity for real needlewomen to throw away not only socks. Outdated incandescent bulbs are also worthy of attention. After all, they make real glass Christmas tree toys - a worthy alternative to already bored plastic.
The simplest option: paint the candle-shaped bulbs with a golden or silver spray (remembering about the year of the Metal Rat) and decorate with sequins, or roll in sequins. But it’s much more interesting to do DIY crafts for the New Year in the form of a funny animal or a fairy-tale character. For example, penguins are very much in demand, invariably associated with winter and causing an involuntary smile when looking at them.
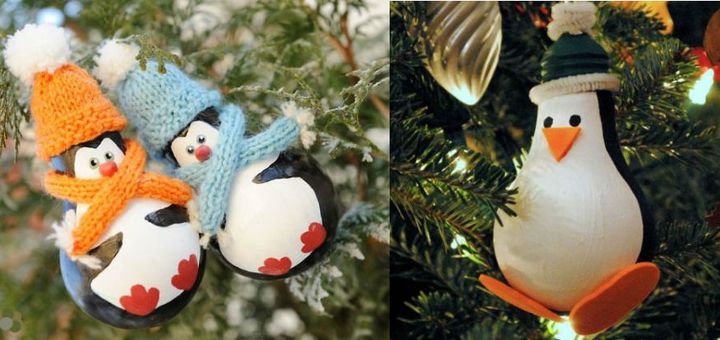
To turn a light bulb into a cute inhabitant of Antarctica, you need a little:
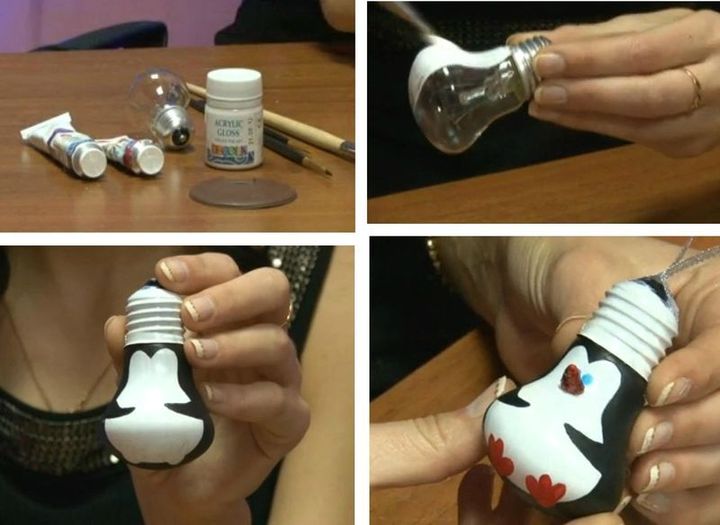
- water emulsion and acrylic paints;
- varnish;
- a piece of felt of orange color;
- any fabric, yarn, fur, etc.
First, using a washcloth or a piece of foam, we apply a layer of a water emulsion to the light bulb. This method is called tamping. We apply a sponge with paint to the surface and sharply raise it up, making sure that the layer is dense and uniform. Coloring is done by point motions. You can blow out a light bulb from the airbrush, if any.
When the first layer dries, you need to look at the light if there are any “bald patches”, they will need to be passed again. Next, draw the black coat of the penguin with black acrylic paint, and the legs with orange. The beak is made of felt. The hat can be sewn or knitted. It will close the unsightly base and, especially in combination with a scarf, will give the toy personality.
Festive cone wreath
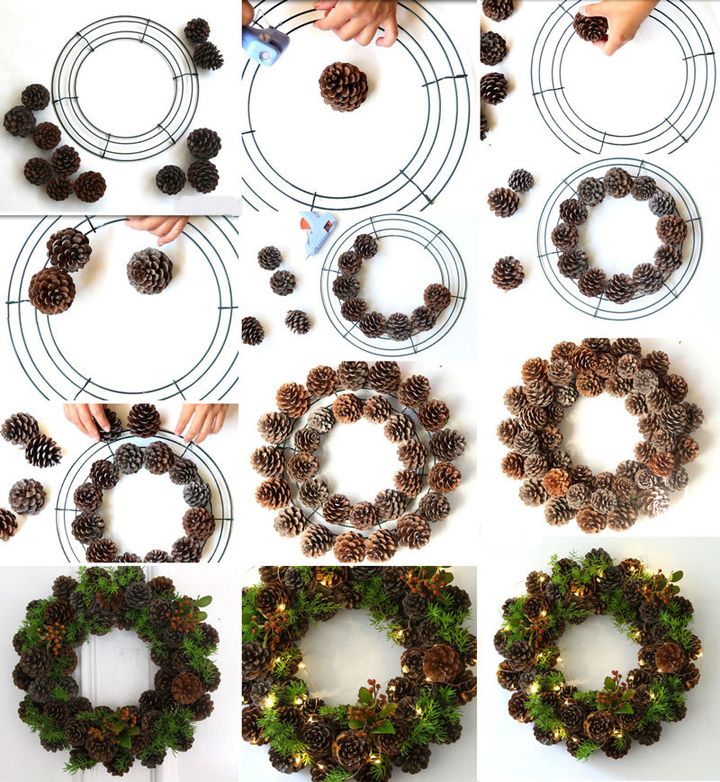
Pine and spruce fruits are the favorite winter material of both children and adults. The bumps themselves are beautiful, and if you put a little imagination, they turn into man-made masterpieces. It costs nothing to collect them in the nearest green zone, then to make a magnificent decor for the front door.
You will need:
- a round base made of wire, thick cardboard or foam;
- large pine cones;
- branches of evergreen plants: spruce, juniper, arborvitae, holly berries;
- thermal gun.
We paste the cones on the base in 3 rows, and the latter will rise above the rest, creating a volume. Fill the spaces between the fruits with herbs, add berries (they can be replaced with mountain ash or viburnum). Decorate the wreath with an electric garland. Stylish Christmas accessory is ready.
How to tie an amigurumi mouse: video
Read also:

 (1 ratings, average: 1,00 out of 5)