Content
Lovers of yarn toys will definitely want to tie a pretty Rat - a symbol of 2020 by crocheting. These rodents are especially good if made using the amigurumi technique. A funny gift that keeps the warmth of human hands will come in handy on New Year's holidays, delighting both adults and children.
A knitted toy can be dressed up in a suit appropriate to the image, put on the frame, add accessories from other materials. In a word, full scope for creative imagination. The main thing is to choose the appropriate scheme so that the rat or mouse will turn out exactly as the craftswoman originally intended.
Interior toy on the frame
A completely charming rat, which you want to leave in the house not for a year, but forever, can be tied from a warm cozy mohair. Fluffy yarn makes the animal both fabulous and naturalistic, causes a pleasant tactile sensation. The rat is made in the spirit of good illustrations by the Dutch artist Marjolen Bastin.
You will need:
- hook size 3mm;
- 50 g of gray Angora yarn 500 m / 100g;
- pink mohair or wool yarn for paws;
- black floss to embroider the nose;
- mustache fishing line;
- wire, D 1 - 1.5 mm;
- filler;
- large beads or eyes for toys.
We start making the rat with the lower legs.
Hips
For the toy, the technique of spiral knitting was selected, with columns for the front and rear walls of the loop. Significantly simplify the process, especially for beginner needlewomen, special markers that indicate the beginning of a circular row. They help not to miss the moment when you need to switch to a new column. This happens one loop before the marker. It is important to monitor the symmetry of the future rodent and, if the marker moves, tie the posts in time.
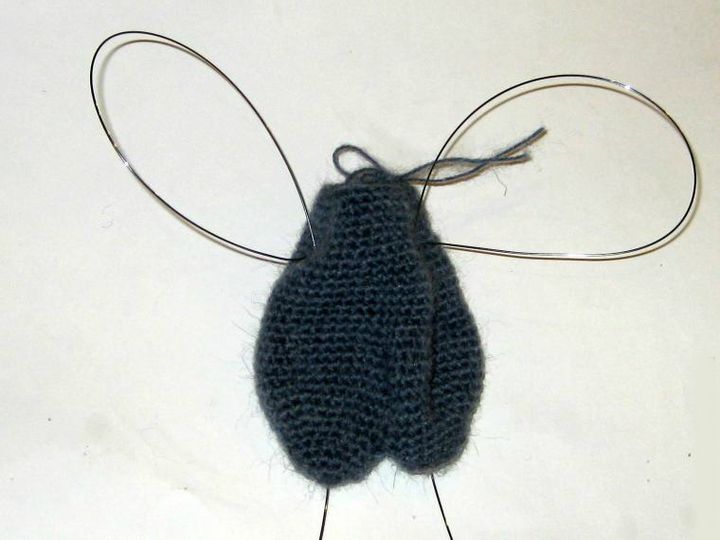
Yarn must be taken with a high mohair content to make the rat fluffy. Use a thread in two additions. Be sure to provide holes for the wire frame, which not only allows the animal to stand without support, but also serves as the basis for the paws and tail.
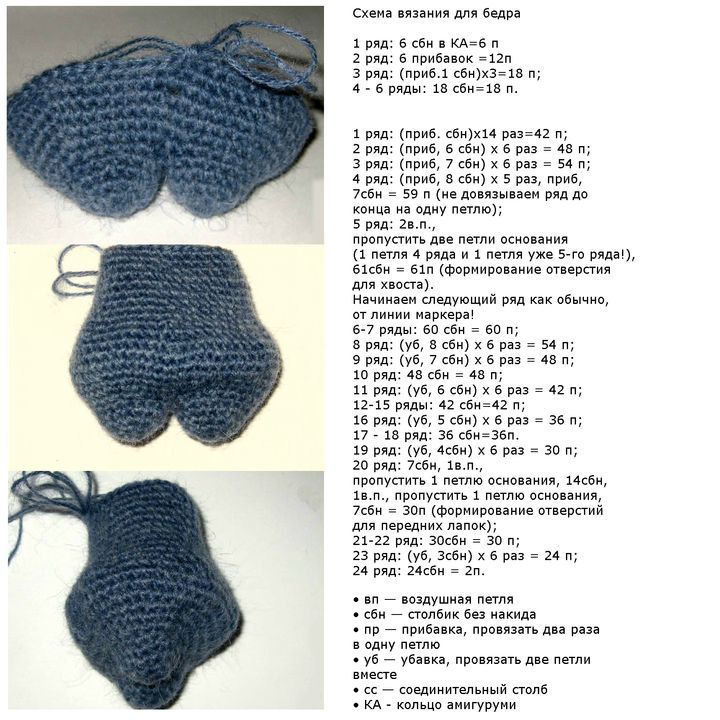
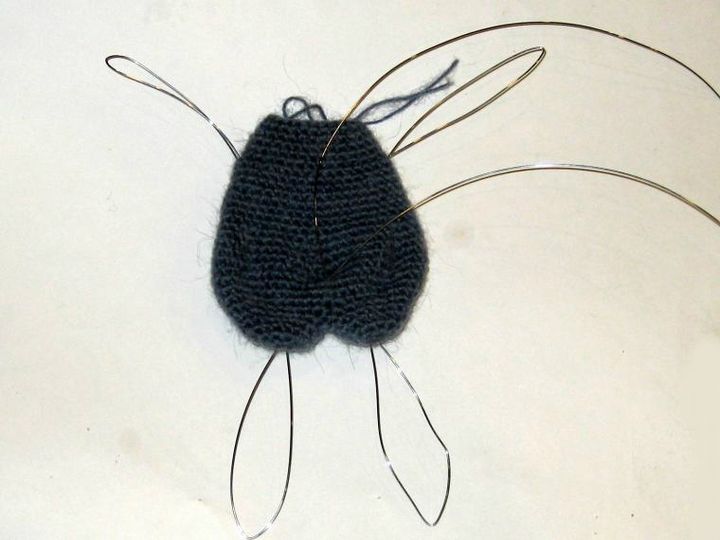
Torso
The lower part of the product is prepared, it is time to move on to creating the frame and stuffing. Cut a piece of wire - about 20 cm (you can slightly more for a margin) and stretch it into the holes for the upper legs. It is important that both ends are located at the same distance from the center of the body. We bend the wire from two sides, leaving a length of 5 - 7 cm and thread it through the same holes again, only from the outside to the inside.
We withdraw through the ring of amigurumi, which is at the base of each thigh. We do the same as with the upper legs: we bend to a length of 7 - 8 cm, insert it back into the hole and thread the ends into the left place for the tail.
The wire blanks are either twisted together or simply pressed together using pliers. Tightly stuff the body with holofiber. This type of filler is better than the synthetic winterizer familiar to many needlewomen, since it is consumed in smaller quantities and, thanks to its fine structure, better fills hard-to-reach corners.
We tie the upper part and the head according to the following pattern:
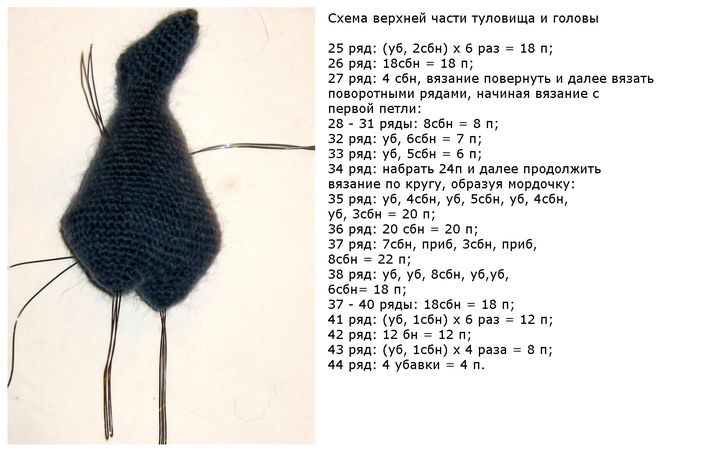
As you add rows, do not forget to increase the amount of filler, so that it is evenly distributed inside the body.
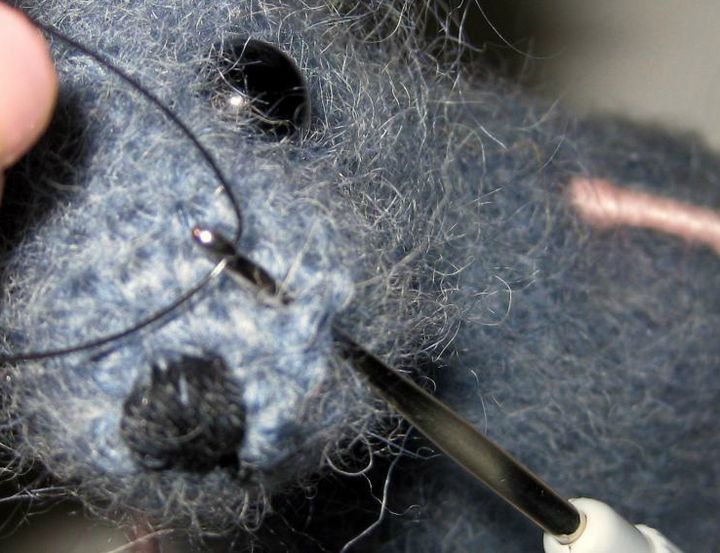
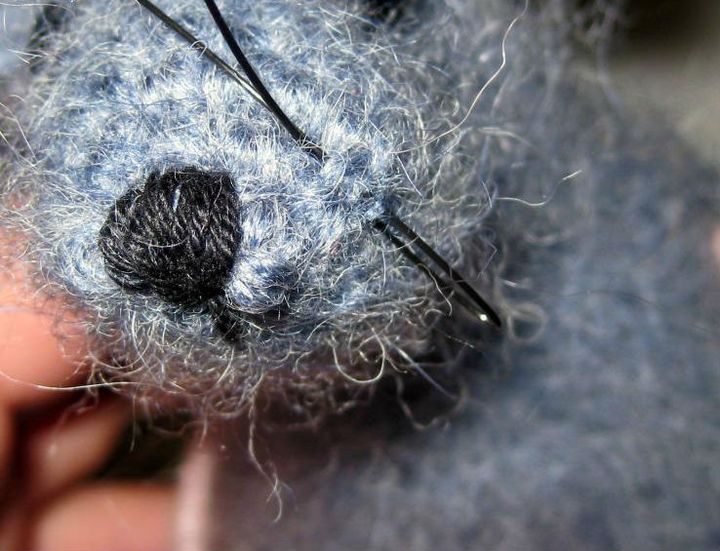
Muzzle
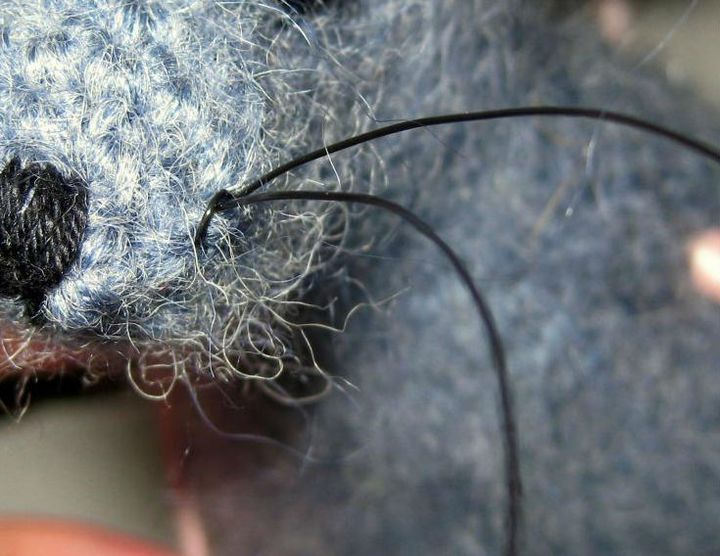
We embroider the nose of the animal mouline thread.Another important point is the “implantation” of a black fishing mustache. The algorithm is as follows:
- bend the "mustache" in half and hook carefully stretch between the loops of the muzzle in an appropriate place;
- into the resulting loop we wind the ends of the line;
- tighten and hide the mount.
Sew beads-eyes symmetrically on the sides of the head. We tighten the thread passing through to form depressions.
Ears
We will bind them separately and sew them to the head of the rat.
1st row: 6 p in spacecraft;
2 row: 6 arr = 12 p;
3 row: 12 sbn = 12 p.
Muzzle and ears are slightly tinted with pink pastel or blush - the rat will come to life and become prettier.
Paws and tail
Smooth paw sticks look rustic. It is advisable to somehow distinguish the rat's palms and feet. For this, the loops with which the wrap ends are first wrapped with a layer of woolen threads, giving a thickening. And only then each of the legs is completely “passed” with yarn, even twice if the thickness of the layer seems small.
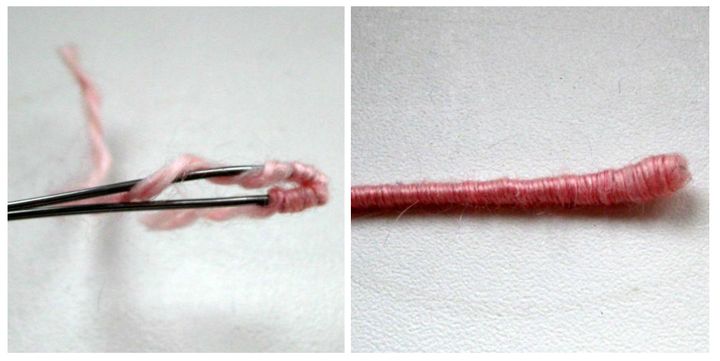
The tail should be made thicker at the base, using the same technique as for the legs. At the end of the work, we give the subject of pride of any rat a beautiful bend. To make the curl smooth and clear, it is better to form the wire around some suitable object in diameter, for example, a cardboard sleeve.
It remains to comb the toy, knit it with a cute winter scarf, as well as sew an elegant lace skirt, because someday the cold will be replaced by heat. In a word, dress up to your liking, and then put it in a prominent place. Let the crocheted rat 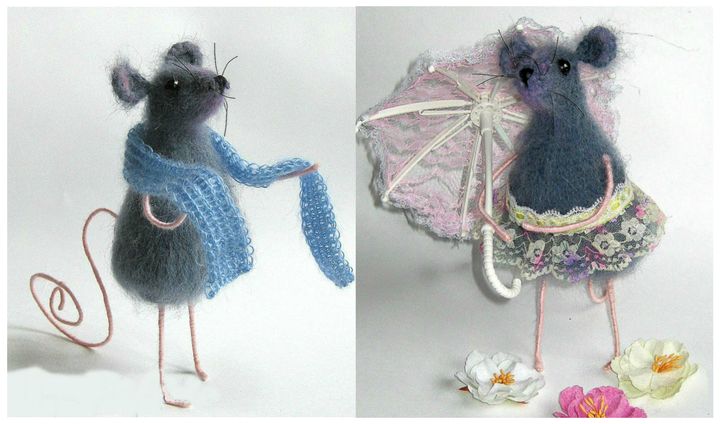
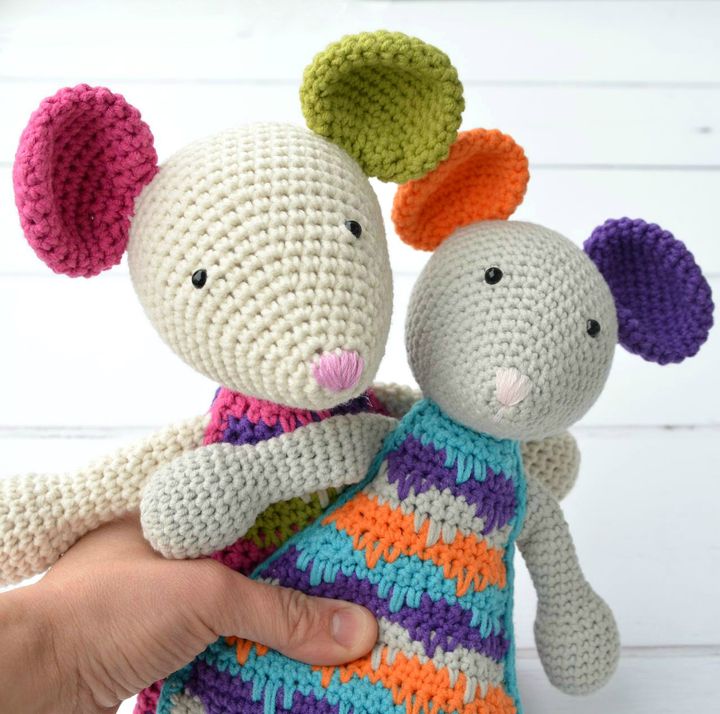
Amigurumi mouse
If the previous master class was designed for experienced craftswomen, then such beginners can easily create multicolored babies. For a mouse, it is better to take acrylic yarn - it has several advantages at once:
- keeps shape well in the product;
- pleasant to the touch;
- does not stretch after washing;
- presented in a wide range of colors;
- convenient for beginners, unlike cotton or wool.
All of the above applies only to high quality acrylic.
For work you will need:
- acrylic yarn of 3 different colors;
- hook number 4;
- white thread floss for the nose;
- bead eyes;
- filler: synthetic winterizer, holofiber.
It is undesirable to take cotton wool - it rolls down during washing and deforms the toy, and also has the ability to crawl through large holes if the knitting is loose enough.
The creation of amigurumi toys always starts the same way - from the ring. The scheme of its creation is shown below:
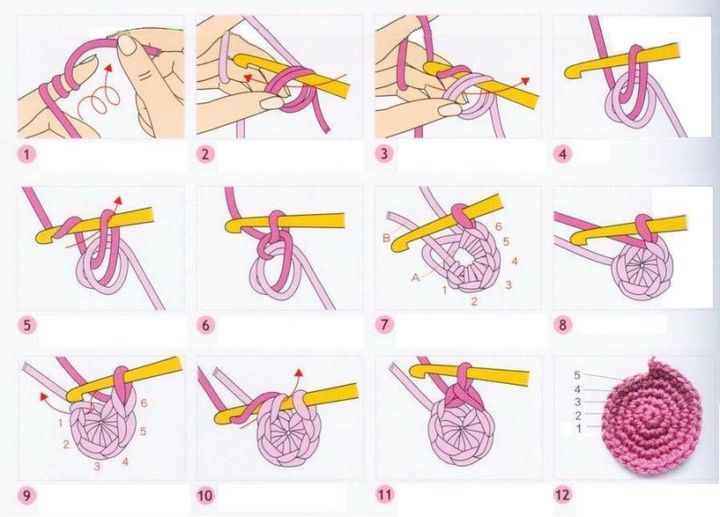
Toys can be either round or oval and are knitted as columns with a crochet, and without it. To achieve the desired result, in the segments of which the amigurumi consists, they add loops. There are several popular ways:
- When the increase accentuates the boundary between the segments and is always done on the last column.
- Creation of asymmetric, reminiscent of the wings of a mill wedges, rounded in one direction, by adding the first loops.
- The lack of a visible border between the wedges. Achieved by a shift in the rows.
The choice of a particular method depends on the design concept of the toy.
For knitting the symbol of 2020 - Mice or Rats crocheted in this case, it is better to stop on the third option.
The tail and ears are made separately and sewn to the finished product. We embroider the nose and mustache with white floss, the eyes are made of beads. A simple mouse will be a great souvenir for the New Year holidays. She will be delighted even by those who are not very supportive of all kinds of rodents.
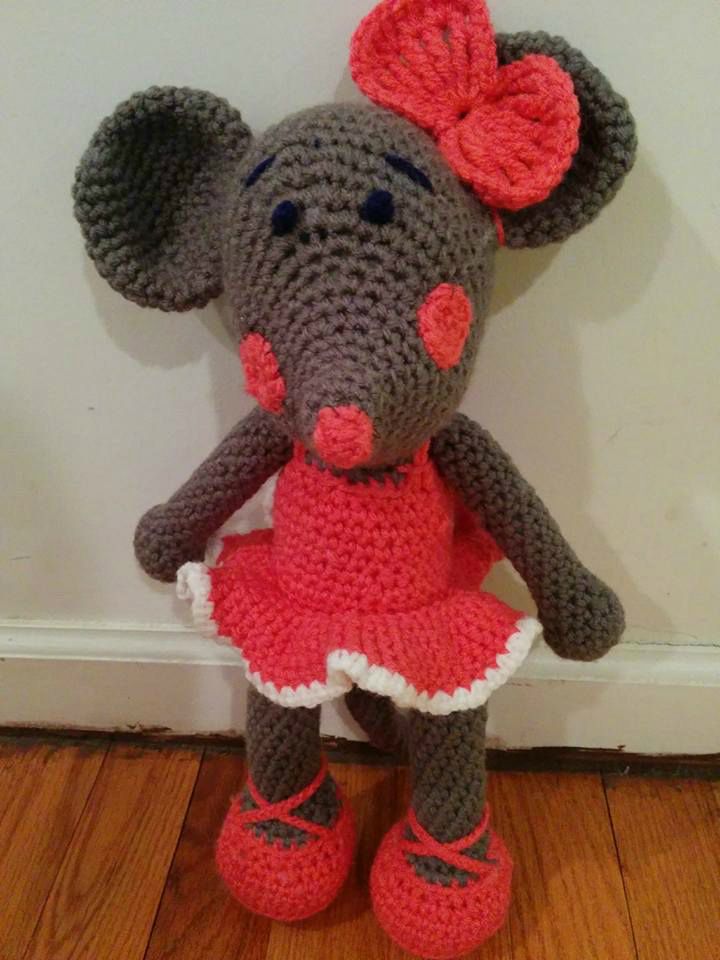
Amigurumi rat as a gift to a child
Children really like toys made from yarn in a special Japanese technique. Pretty creatures are called "make friends" with them. Therefore, if you crochet the 2020 symbol and put it under the tree, the explosion of positive emotions will be ensured.

You will need:
- yarn of 3 colors: light gray, pink, white and black;
- hook number 2 (our rat is not very big);
- any filler.
If desired, you can try other combinations of colors, based on the preferences of the recipient - small or adult, for whom a handmade gift is made. In addition to the classic set for crocheting, you will also need a needle, threads matching the torso of the animal and some interesting accessories, for example, a skirt and a bow if you plan to make a “girl” or funny pants and a hat for a “boy”.
Features of knitting amigurumi - in a spiral, without closing the rows, suggest the use of markers. These are small bright tag details that you can buy or make yourself from improvised materials. Without them, it is easy to get off, which will lead to numerous alterations.
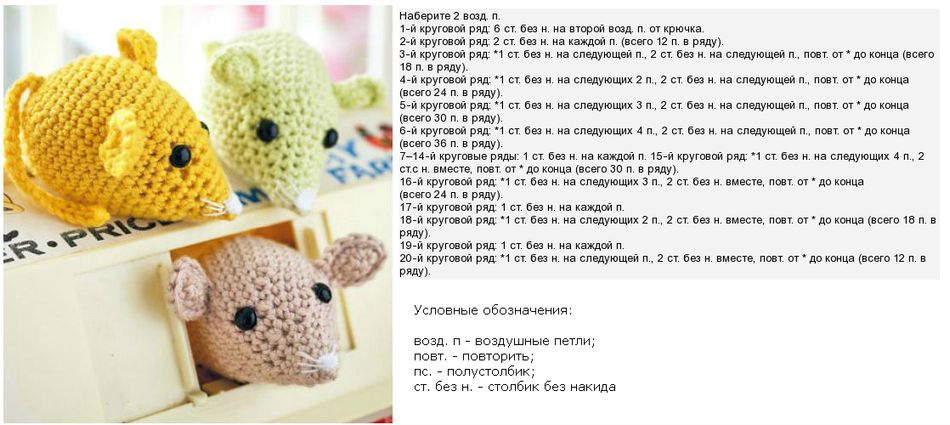
Accepted abbreviations:
sbn - single crochet;
We begin to knit a rat with an invariable ring - a characteristic difference of each amigurumi toy. Details are described in the attached diagram.
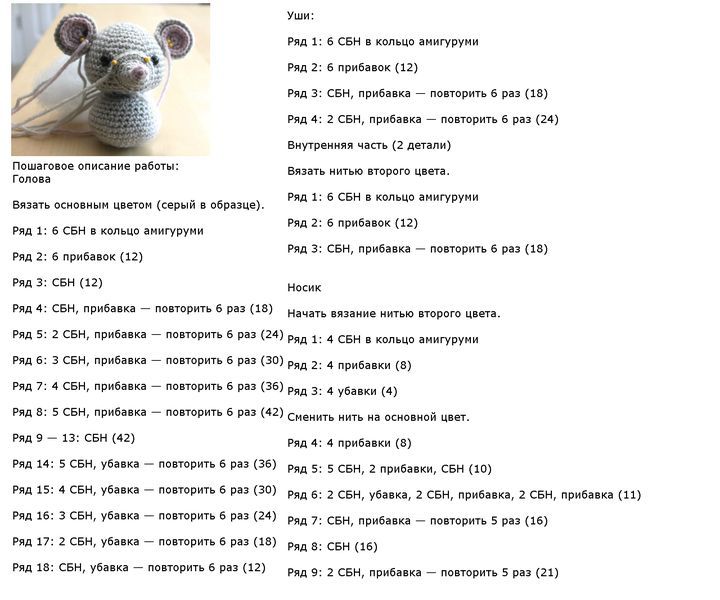
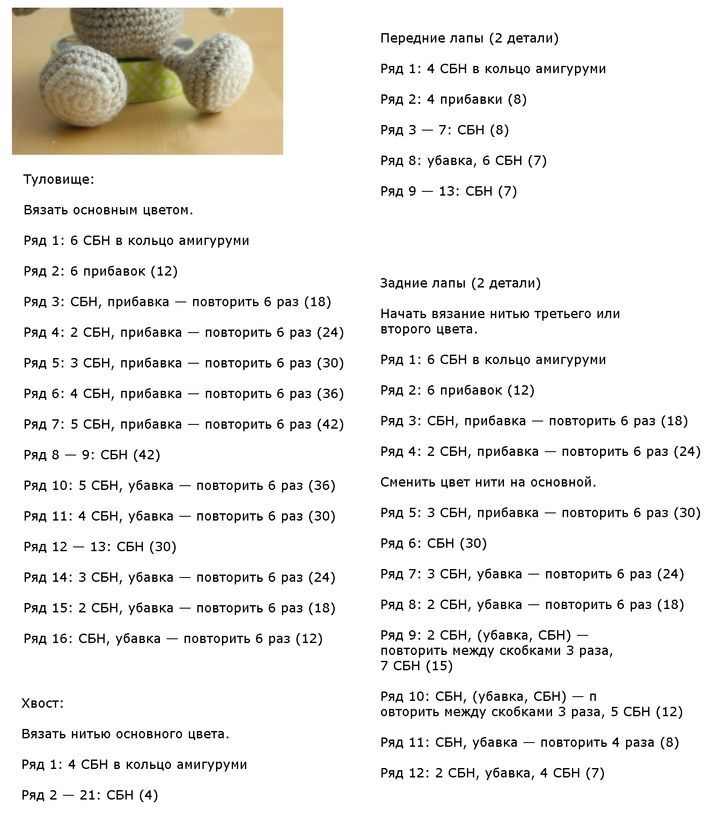
The toy consists of several parts. The main ones - the body and head are stuffed and fastened first. You can staple them not evenly, but at a slight angle. It will seem that the toy has tilted its head and is carefully studying others.
Ears, nose, tail and paws are knitted separately, and then sewn to the base. Stitches should be as inconspicuous as possible. Ears consist of two parts: the outer main shade, the larger diameter and the inner pink, smaller size. Having finished the circle, it is pulled together to give volume, and the thread is left. Her detail will be attached to the head of the toy.
The inside of the ear can be turned inside out to give texture.
The nose is stuffed with holofiber so that the tip sticks fervently up. The upper legs are left without filler - they are already quite voluminous. The same applies to the tail, and to give it stiffness (otherwise the toy will not sit well, falling backwards), you can insert the wire inside. At the lower legs, only feet are filled.
By slightly changing the scheme, you can crochet the following symbols of 2020:
Practical tips
Amigurumi babies cause an irresistible desire to immediately take up the yarn and acquire even a couple of such lovely creations. But, as in all areas of Japanese art or needlework, there are secrets. Why do some craftswomen disappointedly lay their instruments aside and lose their desire to plunge further into the magical world of amigurumi?
- The hook is too thick. The mismatch of the number of the tool and the yarn leads to the fact that the knitting is loose, and the product is shapeless. Experienced craftswomen advise, having looked at the recommendation on the label, take a hook one less number.
- Right - left, where is the side? Quite often, needlewomen confuse the front side with the wrong side and not at all in order to play with the texture. A simple inattention turns into an untidy look of knitted dolls and painstaking work on their remaking.
- The synthetic winterizer tangled in a yarn. It is this common filler that often peeks out through gaps in rows. Moreover, he is intertwined with threads, not wanting to "hide" back. A tricky technique will help to cope with the obstinate material - the body is not filled to the end, leaving gaps between the knitted walls and the synthetic winterizer inside. And only at the end of work through the small hole add the missing filler.
- "Running" eyes. Beginners love to decorate dolls with these masterpieces from Chinese manufacturers, thinking that moving pupils give realism. In fact, these elements look cheap and turn an exquisite hand made into kitsch.
- Inefficient savings. Again about the filler. Invisible to prying eyes, it is nevertheless very important for the aesthetic appearance of amigurumi.Trying to save on quality material, the craftsmen find analogues in their own bins - unnecessary pieces of fabric, trimmings of yarn, foam rubber and so on. As a result of improper packing, products acquire “potholes” and bulges in the most inappropriate places. And sometimes, after a little standing, they settle down, spreading out in an awkward lump. Do not spare money for a quality holofiber or syntepuh, if you want to experience only positive emotions when looking at your own work.
How to tie a rat with your own hands: video
Read also:
 (1 ratings, average: 5,00 out of 5)